
Landscape Software News
Free Updates Now Available
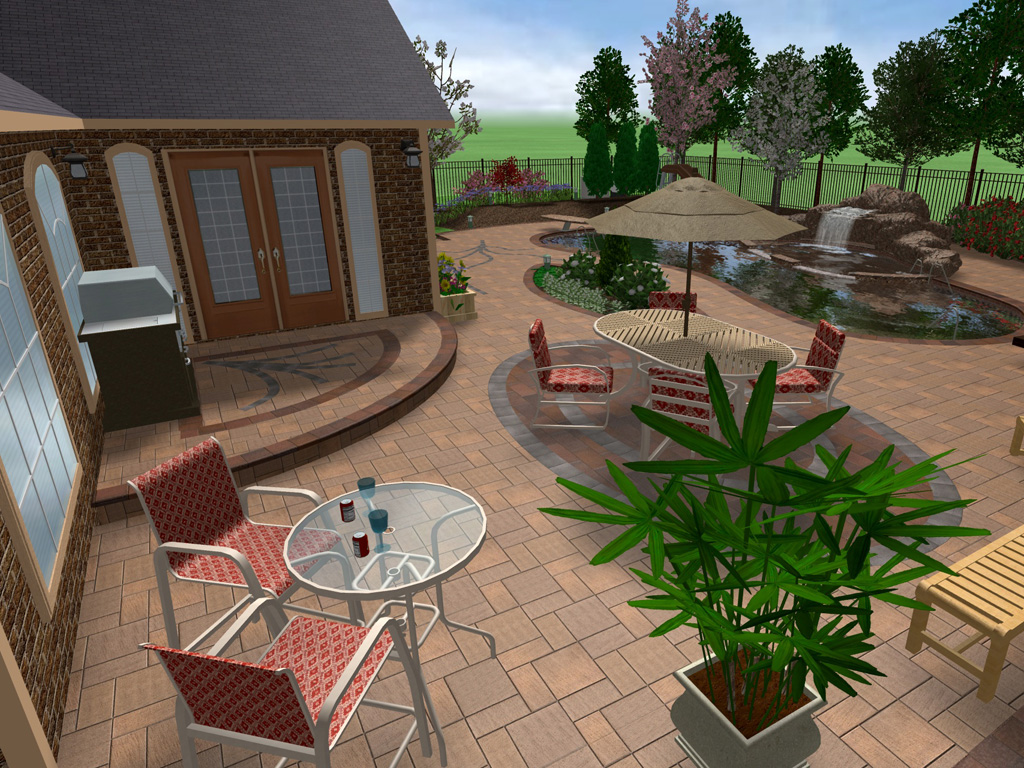
An update is now available for all versions of Realtime Landscaping 2026.
This update includes updated Unilock materials, new HDR Skies for Architect and Pro, enhanced swimming pool features for Architect, and many more new features and fixes.
For more information, click one of the following links:
Realtime Landscaping Architect
Realtime Landscaping Pro
Realtime Landscaping Plus

Realtime Landscaping 2026 is now available!
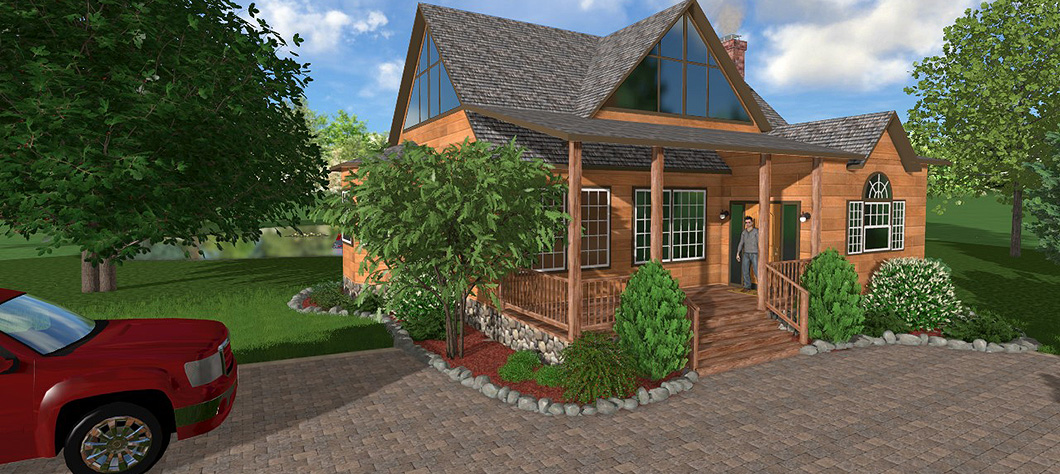
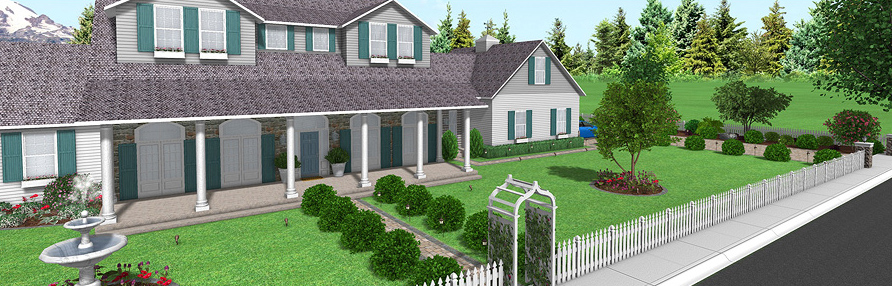
The 2026 upgrade focuses on realism and workflow improvements, with faster, higher-quality path tracing, better materials via displacement mapping and automatic tiling cleanup, and more accurate architectural details like recessed doors/windows and expanded arc support. It also adds an Object List for easier scene management, new deck components, decals, lighting, hundreds of new materials and accessories, customizable shortcuts, and a data transfer wizard to simplify backups and sharing.
What’s new in Realtime Landscaping Architect 2026
What’s new in Realtime Landscaping Pro
What’s new in Realtime Landscaping Plus
Do you already own a Realtime Landscaping product? See our FAQ for upgrade options.

Realtime Landscaping 2025 is now available!
Design even more realistic landscapes with a new suite of house parts, use arcs as a new point type when creating shapes, and choose from 200 new UltraRes Plant® trees and shrubs. This release is among the largest we have produced and includes new tools, new and recreated objects, additional features, and much more.
What’s new in Realtime Landscaping Architect 2025
What’s new in Realtime Landscaping Pro
What’s new in Realtime Landscaping Plus
Do you already own a Realtime Landscaping product? See our FAQ for upgrade options.

We at Idea Spectrum wish all of you and your families a great holiday season. We would also like to wish happy holidays to our employees, NBL Software, Unilock, and all of the other fantastic partners we have had the pleasure of working with.

Realtime Landscaping 2023 is now available after three years of development.
Realism has been greatly enhanced, new tools are available, and a wide variety of new features and improvements have been added.
Do you already own a Realtime Landscaping product? See our FAQ for upgrade options.
For more details on landscape design software for 2023, click the product of your choice:
Realtime Landscaping Architect
Realtime Landscaping Pro
Realtime Landscaping Plus
Free Updates Now Available
An update is now available for all versions of Realtime Landscaping 2023.
This update includes updated Unilock and RI Lampus materials, updated panel fences, new wood and vinyl lattice materials, and more.
For more detailed information, click one of the following links:
Realtime Landscaping Architect
Realtime Landscaping Pro
Realtime Landscaping Plus

Free Updates Now Available
An update is now available for all versions of Realtime Landscaping 2020.
For more detailed information, click one of the following links:
Realtime Landscaping Architect
Realtime Landscaping Pro
Realtime Landscaping Plus
Due to the COVID-19 spread in Washington State, shipping of the boxed version of our software has been suspended to allow our office staff to work from home. The full version of our software can be downloaded immediately after it is purchased, so this should affect very few customers. However, we understand some people have slow download speeds and apologize for the inconvenience.
Realtime Landscaping 2020 is now available. This upgrade transitions Realtime Landscaping fully to 64-bit.
Designers of complex landscapes can enjoy faster loading times, performance improvements to landscape editing, unlocked system RAM usage, the ability to create larger video files, and more.
Do you already own a Realtime Landscaping product? See our FAQ for upgrade options.
For more details on landscape design software for 2020, click the product of your choice:
Realtime Landscaping Architect
Realtime Landscaping Pro
Realtime Landscaping Plus

An update is now available for all versions of Realtime Landscaping 2018.
For more detailed information, click one of the following links:
Realtime Landscaping Architect
Realtime Landscaping Pro
Realtime Landscaping Plus
We at Idea Spectrum wish all of you and your families a great holiday season. We would also like to wish happy holidays to our employees, NBL Software, Unilock, and all of the other fantastic partners we have had the pleasure of working with.
We are thrilled to announce that Realtime Landscaping Plus 2018 has received Top Ten Review’s Gold Award for 2018! Click here (Realtime Landscaping Plus Review) to read their comprehensive review.

Realtime Landscaping 2018 is now available. Visualize your landscape designs with new UltraRes Plant® models, the new Stone Edging tool, new 3D landscape accessories, glass block windows, new presentation tools, and more.
Whether you are a professional landscape designer or a homeowner, Realtime Landscaping 2018 is the perfect choice for visualizing your landscape design ideas.
Do you already own a Realtime Landscaping product? See our FAQ for upgrade options.
For more details on landscape design software for 2018, click the product of your choice:
Realtime Landscaping Architect
Realtime Landscaping Pro
Realtime Landscaping Plus

We are happy to announce that Realtime Landscaping 2017 is now available! This upgrade introduces true dynamic support for 4k monitors and other high resolution displays, as well as updated Unilock and Lampus materials, and more.
For more details on landscape design software for 2017, click the product of your choice:
Realtime Landscaping Architect
Realtime Landscaping Pro
Realtime Landscaping Plus

We have added 20 new videos and 35 text tutorials over the last few months, including our In-Depth: Getting Started tutorials and Product Overview videos. All of our video and text tutorials can be found here: Tutorials
More video and text tutorials are in production!
An update is now available for all versions of Realtime Landscaping 2016. This update includes several important fixes, and a nice improvement to the appearance of cursive text in Architect’s Plan view.
For more detailed information, click one of the following links:
Realtime Landscaping Architect
Realtime Landscaping Pro
Realtime Landscaping Plus
Our international reseller NBL Software has developed a custom version of our Realtime Landscaping software in Spanish. We are excited to see landscape designers from all over the world visualize their creations in stunning 3D! Visit www.landscapedesigner-int.com for details.
We are pleased to announce the availability of an update for the Realtime Landscaping 2016 product line. This update includes many fixes, improvements, and updated materials from our partners at Unilock, R.I. Lampus, and EP Henry. We have also added the ability to import models from SketchUp 2016.
For more detailed information, click one of the following links:
Realtime Landscaping Architect
Realtime Landscaping Pro
Realtime Landscaping Plus
We are very excited to announce the release of Realtime Landscaping 2016! After nearly two full years of solid development, Realtime Landscaping is now sleeker, faster, more technologically advanced, and supports many new features.
Here is a short summary of some of our favorite additions:
See All the New Features Added for 2016:
Architect • Pro • Plus

We at Idea Spectrum wish all of you and your families a great holiday season. Idea Spectrum is what it is today due to the overwhelming positivity and support of our customers, and we greatly appreciate it. We would also like to wish happy holidays to our employees, NBL Software, Unilock, and all of the other fantastic partners we have had the pleasure of working with.
Eleven new video tutorials are now available via YouTube and on our tutorial pages. These new tutorials cover modifications to terrain and the creation of custom objects. New tutorials are in production. Have a tutorial suggestion? Contact Us and let us know! Idea Spectrum has been working hard on producing upgrades for the Realtime Landscaping product line, and we are very excited for the future of landscape design.
Windows 10 is released, and we are happy to report that the latest versions of our Realtime Landscaping software works great with the newest member of the Microsoft Windows family. Realtime Landscaping now supports Windows 10, 8, 7, and Vista. See System Requirements for more info. New video and text tutorials are also available, and can be found here: Tutorials

We are excited to announce the availability of a large update for the Realtime Landscaping 2014 product line. This update includes many fixes, improvements, and new materials from our partners at Unilock, Belgard, and R.I. Lampus. We are also happy to announce the addition of a new product line: EP Henry.
Click one of the following links for more information:
Realtime Landscaping Architect 2014
Realtime Landscaping Pro 2014
Realtime Landscaping Plus 2014
Idea Spectrum wishes a wonderful new year to all our customers and associates.
2014 has been an exciting year for us; Idea Spectrum passed its ten year anniversary, Realtime Landscaping made its way into multiple European localizations, and we have continued to improve our 3D landscaping software. We look forward to another great year ahead.

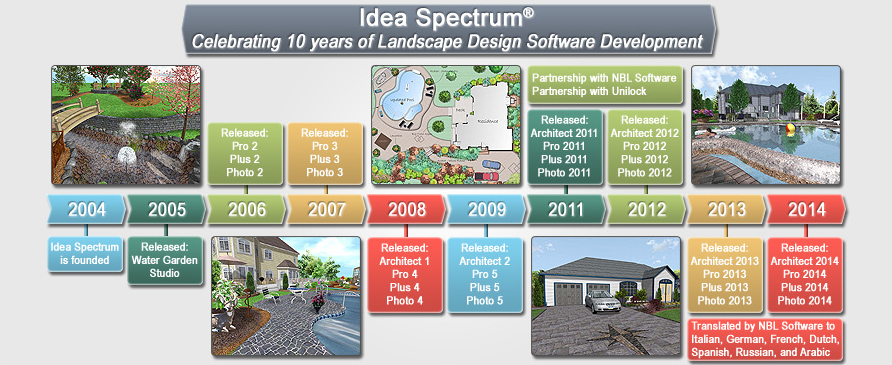
Just recently, Idea Spectrum passed the decade milestone and is celebrating its 10 year anniversary.
Founded in 2004, Idea Spectrum has been consistently developing landscaping design since its inception. We are very thankful for our terrific customers, great employees, and the close friends we have made in our pursuit of the very best landscape design software.
View Older News
New Landscape Design Software now Available!
![]() Realtime Landscaping Architect 2014
Realtime Landscaping Architect 2014
Have version 2011, 2012, or 2013? Upgrade for $149.95
![]() Realtime Landscaping Pro 2014
Realtime Landscaping Pro 2014
Have version 2011, 2012, or 2013? Upgrade for $29.95
![]() Realtime Landscaping Plus 2014
Realtime Landscaping Plus 2014
Have version 2011, 2012, or 2013? Upgrade for $24.95
Idea Spectrum is excited to announce Realtime Landscaping 2014!
Some of the new features in our professional landscape design software:
| New UltraRes Plants® | Enhanced Graphics |
| Maximum Design Size Doubled | New Patio and Entry Doors |
| New Pavers | New Deck Lights |
| Improved Terrain System | New Wicker Patio Furniture |
| New Vehicles | Additional Accessories |
| New Fence Styles | Greater Ease of Use |
| SketchUp Make Support | New Panel Fences |
March 5, 2015 – New Tutorials Available Now!
We are happy to announce that new video tutorials are now available via YouTube and on our tutorial pages. Additional tutorials will be added shortly.
Idea Spectrum is hard at work producing updates for the Realtime Landscaping product line. We look foward to some exciting improvements and new features.
October 10, 2014 – New Tutorials Available Now!
We are happy to announce that new video tutorials are now available via YouTube or our tutorial pages. Video tutorial production is ongoing, and more will be added as time progresses.
Additionally, we are also producing written versions of each tutorial, which can also be accessed via our tutorial pages. The written tutorials are more verbose and include high resolution images. The purpose of producing these written versions is in response to customers that are deaf, do not always have access to high-speed internet, or wish to print a tutorial for later reading. Nine written tutorials have been added thus far, and it is our intention to add new written tutorials each week.
February 21, 2014 – New Galleries and Tutorials Available Now!
We are excited to announce that new tutorials and image galleries are now available for all products!
High quality tutorial videos have been created for each product in the Realtime Landscaping line. Get started with your landscape design faster than ever! Currently, 29 new video tutorials are available. Additional tutorials are under production and will be continually uploaded as they are completed.
February 10, 2014 – Idea Spectrum Website has been Upgraded!

We are happy to announce that we have upgraded the Idea Spectrum website and moved it to new and improved servers.
For the past few years, our customer base and web traffic have been steadily increasing. In order to handle the extra volume effectively, we have greatly improved the speed and performance of our website.
November 29, 2013 – Happy Holidays!

We at Idea Spectrum wish all of you and your families a great holiday season. We are very thankful to all of our loyal customers who have helped to make this year our busiest ever. Thank you for all of your suggestions and recommendations over the years.
We would also like to wish an enjoyable and productive holiday to our employees, NBL Software, Unilock, and all of the other fantastic partners we have had the honor of working with.
August 26, 2013 – New Maintenance Updates Available!
New maintenance updates are now available for download. In addition to many fixes and improvements, we are happy to announce the addition of two new product lines: Highpoint Deck Lighting and Lampus Paving Stones.
Click a link below to download the free update:
Realtime Landscaping Architect 2013Download Update
Realtime Landscaping Pro 2013Download Update
Realtime Landscaping Plus 2013Download Update
August 6, 2013 – Bring your Designs to Life with 3D Characters!

Add an extra touch of realism to your landscape designs by adding life-like 3D people. Each of the available characters can be shown with a variety of animations, including sitting, walking, jogging, standing in place, or even swimming. Realistic 3D characters are new to the 2013 versions of Idea Spectrum’s Realtime Landscaping software.
For characters that jog, walk, or swim, you are able to easily define a path for them to travel. Their start time can be delayed, making their appearance seem more natural. This is especially useful when designing parks, housing developments, and other large designs.
March 8, 2013 – New Landscape Design Software now Available!
![]() Realtime Landscaping Architect 2013
Realtime Landscaping Architect 2013
Have version 2, 2011, or 2012? Upgrade for $149.95
![]() Realtime Landscaping Pro 2013
Realtime Landscaping Pro 2013
Have version 5, 2011, or 2012? Upgrade for $29.95
![]() Realtime Landscaping Plus 2013
Realtime Landscaping Plus 2013
Have version 5, 2011, or 2012? Upgrade for $24.95
Idea Spectrum is excited to announce Realtime Landscaping 2013!
Some of the new features in our professional landscape design software:
| UltraRes Plants® | 3D Characters |
| DWG and DXF Import | Skylines |
| Animated Clouds | Google Map Import Wizard |
| Enhanced Plant Label Wizard | Standalone Railing Tool |
| Redesigned Layer System | Enhanced Patio Stairs |
| Realistic Steam | Animated Smoke |
| Bubbling Spa Water | Improved User Interface |
| Enhanced PDF Support | Updated Unilock Products |
| New Loft Tool | 3D Booleans |
November 7, 2012 – French Landscape Design Software Coming Soon!
We at Idea Spectrum have taken pride in working with NBL Software to create localized versions of our landscaping software. NBL currently offers custom versions of our software in Italian, and the French version is coming soon. We are excited to see users all over the world visualize their landscape creations in stunning 3D!
We are excited about our partnership with Unilock, one of the United State’s top paving stone manufacturers. Together we have produced a custom version of our software exclusively for their market: the Uvision 3D Landscape Creator. This exciting new software helps Unilock’s designers and contractors win more bids with realistic designs and real-time presentations. Here’s what some of their customers have to say:
“Best sales tool we have ever used.”
“Awesome program. Easy to use and work around. Haven’t mastered everything, but I learn something new every time I design!”
“As a sole proprietor and landscape designer, this program paid for itself on my first design. A wonderful tool for the customer who needs that visual!”
Windows 8 has been released, and we are happy to announce that Windows 8 and Windows 8 Pro are fully compatible with our landscape design software. Please note that Windows RT is a simplified version of Windows 8 that is intended for low-power devices such as certain tablets and mobile devices. Windows RT is not able to run traditional Windows applications such as ours.
June 25, 2012 – Idea Spectrum Growth and other Announcements!
Idea Spectrum is growing! Please join us in welcoming Dennis McPhee and Summer Ripley to our customer support staff. Once they complete their training, we plan to extend our support hours to better serve you.
Idea Spectrum is also proud to announce the successful launch of NBL Landscape Designer 2012 and NBL Pool Designer 2012: fully translated Italian landscape design applications developed by NBL Software and Idea Spectrum, and published by NBL Software. To learn more, visit www.NBLSoftware.it.
We are looking forward to working with NBL Software to provide quality landscape design software in multiple additional languages.
The developers at Idea Spectrum are currently hard at work creating ground-breaking new features and tools for our entire Realtime Landscaping product line. Whether you are a part of a large landscaping business, or just a homeowner with a small property, Idea Spectrum is working diligently to let you bring your designs to life.
February 14, 2012 – Realtime Landscaping 2012 Now Available
We are happy to announce the launch of our 2012 Realtime Landscaping product line! Our 2012 products include many new features and improvements, including a new enhanced surface detail options, greater material flexibility, new accent strip and shape tools, automatic borders, enhanced coping, and more.

![]() Realtime Landscaping Architect 2012
Realtime Landscaping Architect 2012
Have version 1, 2, or 2011? Upgrade for $129.95
![]() Realtime Landscaping Pro 2012
Realtime Landscaping Pro 2012
Have version 4, 5, or 2011? Upgrade for $29.95
![]() Realtime Landscaping Plus 2012
Realtime Landscaping Plus 2012
Have version 4, 5, or 2011? Upgrade for $24.95
January 16, 2012 – Idea Spectrum partners with Unilock
We are excited to announce our new partnership with Unilock, one of the world’s largest paving stone manufacturers.
Together we have produced Uvision 3D Landscape Creator 2012, a specialized landscape software package for contactors and designers using Unilock products.
This new landscape design software includes many new features not found anywhere else, as well as Unilock’s extensive paver and wall textures. Create realistic driveways, patios and walls with soldier courses and accents for extreme realism. Finally there’s a fast and easy way of helping your clients visualize the outdoor living areas of their dreams.
For product details visit: Uvision 3D Landscape Creator

November 23, 2011 – Happy Thanksgiving!
Idea Spectrum wishes all of our supporters a very happy Thanksgiving this year. We are very grateful for the wonderful reception our 2011 product line has been given, and will strive hard to continue developing great products as we head into the new year.
November 1, 2011 – Design Infinity Edges
New to Realtime Landscaping Architect 2011 is the ability to design swimming pools with infinity edges. Also called “invisible edges” or “disappearing edges”, infinity edges create the illusion of water flowing into the horizon. Inifity edge swimming pools create a dramatic and tranquil effect for swimmers and sunbathers.
To add an infiity edge to a swimming pool, simply click “Edit Edges” and click on the pool where you wish the infinity edges to be placed. There are three different infinity edge profiles, allowing you to tailor your design with precision.
October 6, 2011 – Add Realistic Sidewalks
New to Realtime Landscaping Architect 2011, the 3D Sidewalk tool can be used to quickly and easily add detailed sidewalks to your landscape designs. Sidewalks can be added in any material, from brick to conventional concrete.
To add a 3D sidewalk, click the “Sidewalk” button that is located under the “Road” tab. Draw the sidewalk’s shape and then adjust it as neccessary by modifying options such as Width, Height, Slab Length, Curb Type, and more.
Although the new freeform sidewalk tool is only available in Realtime Landscaping Architect, Pro and Plus users can add pre-build sidewalk sections through the Accessories library.
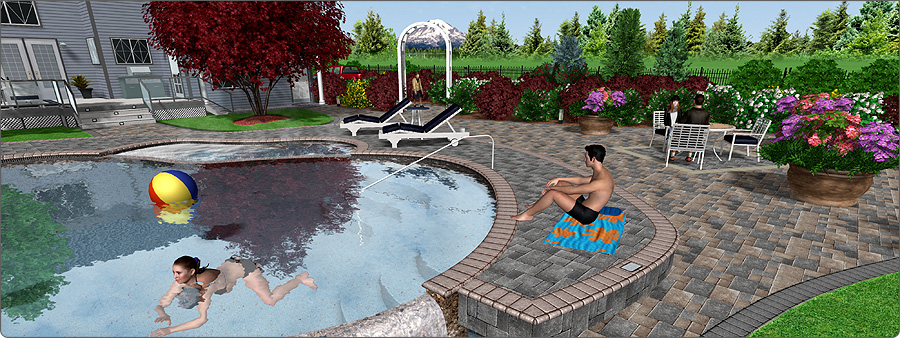
August 23, 2011 – New Landscape Software Review and Swimming Pool Features
A new review of our Realtime Landscaping Software has been released by Landscape Contractor Magazine, and is available here: Landscape Software Review.
“Idea Spectrum in the United States has created an amazingly powerful -yet affordable – landscape design application”
A new webpage has been added to illustrate the powerful swimming pool design abilities of Realtime Landscaping Architect. This detailed website addition contains great pictures and information on the swimming pool features of Idea Spectrum software. The new webpage is available here: Swimming Pool Design Features.
August 16, 2011 – Design Landscapes Using Contour Lines
Contour support is now enabled in Realtime Landscaping Architect 2011 in the form of an intuitive “Contour Line” tool. To create landscaping topography, simply draw contour lines to alter the terrain elevation.
Contour designs can be customized independently for the Plan view and the Perspective view, allowing you to display contours and elevations differently between each view.
July 22, 2011 – View Breathtaking Swimming Pool Designs
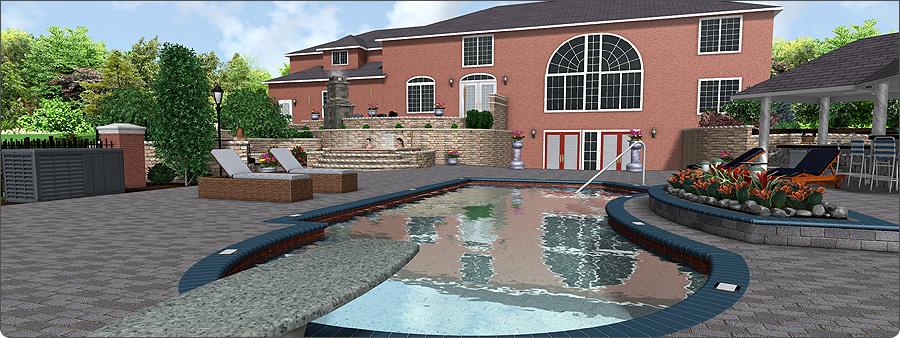
New for 2011, water quality for ponds and swimming pools has been vastly improved in Realtime Landscaping Architect and Pro. When viewing your landscape design in a Realtime Walkthrough, water now has reflections, refractions, brightness filters, and automatic ripples.
To enable hyper-realistic water, simply select the pond or swimming pool you wish to modify and click “Improved water quality”. Also available are checkboxes to enable automatic water ripples and to brighten the appearance of the water during night walkthroughs.
June 10, 2011 – New Video Tutorials Available
Idea Spectrum is in the process of creating a comprehensive library of video tutorials, primarily tailored for users who are new to Realtime Landscaping software. Two tutorials are currently available, and additional video tutorials will be developed shortly.
To view tutorials for your landscape design software, click “Help” and “Tutorials” from within the application. Alternately, simply navigate to the Idea Spectrum website, choose your product, and click “Tutorials”.
Editing Points video tutorial – This video demonstrates how to change the shape of an object such as a deck, house, or grassy region.
Deck Design video tutorial – This video demonstrates how to create a simple and elegant deck.
May 6, 2011 – Free Updates Providing New Content and Improvements
Updates are now available for our landscape design software including Realtime Landscaping Architect, Pro, and Plus. These updates are specific to our new 2011 products, and include features and fixes requested by our users. The updates are fairly large, but should only take a minute or two over high speed connections.
New Content: This update includes 3D golf carts, professional golf hole flags, golf bags, residential solar panels, glass panel fences, wooden deck balusters, and golf flag symbols (golf flag symbols are exclusive to Architect).
To obtain the update, simply follow the appropriate link and begin the download:
Realtime Landscaping Architect – Architect 2011 Updates
Realtime Landscaping Pro – Pro 2011 Updates
Realtime Landscaping Plus – Plus 2011 Updates
April 8, 2011 – New Tutorials, Updated Media Kit, and New Press Release Available
Two new tutorials are available to outline common procedures. Learn how to remove objects from a photograph, which is particularly useful if you are landscaping over a photo of a residence. Also, learn how to email a landscape design.
If you are with the press and would like information on Idea Spectrum, or if you are simply curious about Idea Spectrum’s history, please look through our new
Digital Media Kit. As developments progress, we will add additional press releases and images to the media kit.
Today’s press release focuses on 3D landscape designs as the wave of the future. Because it is so difficult for most homeowners to visualize landscape designs, or to convince spouses and homeowner’s associations, having a realistic 3D landscape representation is an invaluable tool. Read more by visiting the Digital Media Kit and clicking on “Press Releases”.
March 23, 2011 – Updated Software and an All New Website
After two years of constant development, we are proud to release 2011 versions of Realtime Landscaping Architect, Pro, Plus, and Photo, as well as a brand new website.
These new versions of our award winning landscaping software were built on the principles that made our previous versions so successful: ease of use, powerful landscape presentations, and a large amount of quality content.
New users can read about our new products here:
Realtime Landscaping Architect 2011
Realtime Landscaping Pro 2011
Realtime Landscaping Plus 2011
Realtime Landscaping Photo 2011
Current users can upgrade at a reduced price. See below for a summary of the exciting new changes to our landscaping software:
What’s New in Realtime Landscaping Architect 2011
What’s New in Realtime Landscaping Pro 2011
What’s New in Realtime Landscaping Plus 2011
December 24, 2010 – Merry Christmas
Idea Spectrum wishes you a Merry Christmas and Happy Holidays.
For those that have given Realtime Landscaping software as a gift, please remember to include the activation code that was provided at the time of purchase.
If you have misplaced the code, just enter your email address on the following page to retrieve it: Activation Code Retrieval.
December 8, 2010 – Announcing Client Dream: The Easy Way to Present Designs to your Clients
We at Idea Spectrum are happy to officially announce our new upcoming online service: Client Dream. Client Dream is an online service that bridges the gap between client and designer by providing a way to share and comment on designs, as well as creating and sharing presentations. Client Dream will do away with the old fashioned methods of mailing videos on DVDs and e-mailing Jpegs of designs.
Think Client Dream will help your business? A free trial will be available soon. More information on Client Dream and other developments will be posted here, and everyone who has subscribed to our mailing list will receive an e-mail when it’s ready.
November 26, 2010 – Happy Thanksgiving
Idea Spectrum wishes you a Happy Thanksgiving and merry holidays.
This year has passed very quickly for us; it has been busy, productive, and enjoyable. We look forward to many years to come, and we extend our sincere thanks to all of our customers and supportive fans.
A special thanks goes out to Kim Katwijk and his crew for their hard work on the recent Professional Deck Builder magazine issue featuring our software: “Our overall favorite program for renderings was Realtime Landscaping Architect.”
November 19, 2010 – Designing Raised Swimming Pools and Spas
Raised swimming pools and spas are supported in Realtime Landscaping Architect and Pro, and are very easy to design. Raised swimming pools can be safer, less expensive, and easier to install than in–ground swimming pools, and are an attractive option for many homeowners.
To raise a swimming pool or spa, surround it with pool decking and then raise the height of the decking. The pool decking material you choose will become the outer walls of the raised pool. If you are designing on a sloped or uneven surface, both the pool decking and the swimming pool will automatically remain level.
November 12, 2010 – Realtime Walkthrough Sound Effects
Want to make your 3D walk-throughs come to life? Listen to ambient sounds such as wind, birds and flowing water when using the Realtime Walkthrough feature found in Realtime Landscaping Architect, Pro, and Plus.
To access the sound settings, click Settings and Environment Settings. Nine looping ambient tracks are included, such as chirping birds, crickets, wind chimes, and more. You can also import your own sound files using these instructions.
November 5, 2010 – Automatically Saving your Landscape Designs
A function that automatically saves your landscape design, called “Auto File Save”, can be found in each of our landscape design software products. The feature is disabled by default, but can be toggled on or off easily using the Program Settings dialog. Using the Auto File Save feature can help to protect your work from being lost in the event of a power outage or accidental computer shut–down.
To enable the Auto File Save feature, click Settings, Program Settings, and then set the frequency at which you would like your landscape to be saved. Even when the feature is enabled it is still important to save backup copies of your work to protect your data in the event of a hard drive failure; one free method of doing this is to simply email yourself your backup landscape files using Gmail, Yahoo, or Hotmail.
October 29, 2010 – Using the Path Grader
The Path Grader is a very useful terrain modifying tool that supports a powerful feature that is easy to overlook: the Path Grader’s height can be modified at each point, allowing for smooth ramps that are straight or curved. To modify the heights of a Path Grader, click the Edit Points button, select the point you wish to raise or lower, and then move the Height slider. The Path Grader is not limited to creating ramps; it can also be used to create terrain indentations, level building surfaces, and more.
October 22, 2010 – Locking and Hiding Objects in your Landscape Designs
In each of our landscaping software packages, objects in your landscape design can be hidden or locked by layer or by object type. For example, different versions of a design could be placed in separate layers and hidden or shown when needed, or every plant in a design could be locked to prevent accidentally moving one.
To hide or lock objects in a design by object type, click View and Show/Hide Objects. To hide or lock objects by layer, simply double–click the layer that you would like to hide or lock.
October 15, 2010 – Plan Detail Shapes
Within Realtime Landscaping Architect, a palette of tools is available for drawing shapes that only appear in the Plan view. Shapes can be used to create custom symbols, title blocks, legends, and more. Shapes may be solid, patterned, or simply an outline.
To create a shape, use the tools located under the Plan Detail tab. Available shape types include lines, curves, arcs, ellipses, rectangles, rounded rectangles, pies, and free-form polygons. Regardless of which tool is used to create a shape, it can be edited freely at any time.
October 8, 2010 – Landscaping Sloping Property
Simple slopes are easy to create in Realtime Landscaping Architect, Pro, and Plus, and complex slopes can also be designed with very little effort. A complex slope can be curved and irregular, and supports different grades at different parts of the slope. Complex slopes can play a large role in creating an accurate representation of your client’s property.
To create a complex slope, first add a simple slope and click the Edit Points button. Next, add additional points if needed and move the slope line to form its new shape. The rise and run of the slope can be adjusted at each point, granting a large amount of freedom to the slope design.
October 1, 2010 – Diving Boards and Water Slides
Swimming pool designs are more enjoyable and are often more impressive when they utilize recreational objects such as diving boards and water slides. Within Realtime Landscaping Architect and Pro, many different varieties of slides and diving boards are available.
Diving boards and water slides are added using the Pool Accessory tool. Simply click the Pool Accessory button, choose the slide or diving board you would like to use, and add it to your landscape design. Other Pool Accessory objects include handrails, lifeguard chairs, pool ladders, and more.
September 24, 2010 – Adding Plant Labels to your Landscape Design
Adding plant labels to your landscape design can be done automatically or manually using Realtime Landscaping Architect. Plant labels can be simple text tags, or stylized photo callouts of the plant being labeled. With some creativity, plant labels can be both informative and visually complementary to your design.
To place a plant label, click the Plant Label button and place the label near the plant of your choosing. The plant label can be adjusted in nearly every way, allowing you to maintain the style of your design.
You can also use the Plant Label Wizard to automatically add plant labels for you. Once the wizard has added the labels to your lanscape design, you can change them as desired.
September 17, 2010 – Jumping Jets: Adding Fun to your Landscape Designs
Adding realistic jumping jets to your designs can provide a stunning special effect. A jumping jet is a spray of water that appears to “jump” from the jet to the target point. Timed jumping jets are supported in Realtime Landscaping Architect and Pro, allowing for sequential jumps that will draw the eye wherever the jumping jets take it.
To add a jumping jet, click the Add Jumping Jet button and place the jet in your landscape. Multiple jets can be added, and each jet’s angle and timing can be individually set. The color of the water that the jumping jets emit can also be adjusted, allowing you to simulate jumping jets that colorize the water through lighting.
Here’s an example created using Realtime Landscaping Architect.
September 3, 2010 – Add Arbors and Trellises
Arbors, trellises, and pergolas are great ways to add a decorative touch to your landscape designs, and are included in each of our landscaping software packages. The wide variety of landscape design objects available in each Realtime Landscaping program makes it easy to experiment, allowing you to find which arbor, trellis, or pergola is best suited to your landscape.
To add an arbor, trellis, or pergola, access the Accessories library and select “Arbors and Trellises”. Once you have placed the object in your landscape design, its materials and size can be customized. Additionally, plants can be placed on arbors and trellises to simulate guided plant growth.
August 13, 2010 – Lot Boundaries
One of the very first elements added to any landscape design is the lot boundary. In Realtime Landscaping Architect, Pro, and Plus, this property line can be added using the Lot Boundary tool. Boundaries of any size and shape can be easily added, allowing for curved and oddly-shaped lots. For users familiar with survey bearings, metes and bounds can be entered manually.
To add a boundary, click the Lot Boundary button and draw the shape of the lot. When finished, the Lot Boundary’s appearance can be altered to fit the style and color scheme of your design. If needed, the Lot Boundary can easily be edited or hidden.
August 6, 2010 – Lake and Waterfront Landscape Design
When designing landscapes for waterfront properties, water is one of the most important influences on the value and appearance of the landscape. Bodies of water such as lakes, rivers, and ponds can be easily added to your 3D landscape designs using the Pond tool. The Pond tool is included with Realtime Landscaping Architect and Pro. A versatile object, the Pond tool handles both small and large bodies of water.
To create a lake, river, or pond, draw the outline of the water using the Pond tool. Or, you can use the Pond wizard to drop in a pre-built pond for use as a starting point. Next, set the pond floor material to a dark blue in order to simulate the depth of the water. During a realtime walkthrough, Koi will be automatically added and will swim around realistically (you can even feed them by clicking the left mouse button). However, if you don’t plan to stock your water with fish, you can easily turn them off in the Environment Settings menu.
July 30, 2010 – Creating Custom Models using the Lathe Tool
Many unique features can be added to your landscape designs through the use of the Custom Modeling tools, and one of the most useful of these tools is the Lathe. The Lathe is similar to pottery: you design the profile, and the software automatically “spins” it into a model. Lathes are useful for quickly creating posts, columns, round planters, poles, light posts, bottles, and many other objects useful in your landscape and garden designs. The Lathe tool is included with Realtime Landscaping Architect, Pro, and Plus.
To create a lathe, click the Lathe button and draw the profile of the shape. The 3D model will be created instantly. You can edit the model’s profile, material, size, rotation angles, and other properties. See our Custom Modeling Tutorials for more information and examples.
July 23, 2010 – Viewing Sample Landscape Designs
Our landscaping software includes a wide variety of sample landscape designs. These are a great way to see how to design gardens, back yards, patios, decks, fencing, water features, and more. Each sample landscape design can be edited, copied, pasted, and otherwise used for your benefit.
To open a sample landscape design, click Open Sample from the File menu. While browsing the available samples, you will notice a small preview image within the browser to help you choose the one you want. If you would like to make changes to a sample, we recommend you save it to another directory in order to preserve the original.
July 16, 2010 – Realtime Landscaping Output Options
Whether you are a landscaper aiming to impress a client, or a homeowner looking to win over your spouse, each Realtime Landscaping package has multiple output options to give form to your ideas. In each of our products, landscapes can be saved as a picture in a variety of formats (such as JPG and PDF) or printed on paper. In Realtime Landscaping Architect, Pro, and Plus, you can also create 3D video walkthroughs of your landscape designs.
To save your landscape design as a picture to e-mail, send to a print shop, or upload to a website, use the “Print to File” option. To print your landscape on a printer, simply use the “Print” option. To create a movie, add a Realtime Camera and click the “Create Movie” option.
You can also print to large output printers. This is a great way to print posters, large landscape plans, and more. See our Large Output Printing Tutorial for details.
July 9, 2010 – Use Bezier Curves to Improve your Designs
A powerful feature in our landscape software is support for Bezier curves, which help you create accurate curved shapes quickly and easily. Bezier curves are adjusted using two blue handles that extend from each control point; these handles can be moved to change the curvature without moving or adding additional points.
To change a point to a Bezier curve, select the point and click the desired curve type button. The blue handles will then appear next to the selected point(s). To adjust the curve, simply drag the handles using your mouse.
July 2, 2010 – Mirror Objects and Landscape Designs
Invert objects in any direction using the Mirror tool found in the latest versions of Realtime Landscaping Architect, Pro, and Plus. Virtually anything can be inverted, adding variety to your designs and convenience to the design process. Mirroring can be performed on an object, a group of objects, or an entire landscape design.
To use the Mirror tool, click the Mirror button and draw a line that represents the mirror. Your object(s) will be immediately flipped to the opposite side of the mirror line. To mirror your entire design, click “Mirror Design” from the Tools menu.
Idea Spectrum wishes you a happy 4th of July!
June 18, 2010 – Plant Hardiness Zones
Locate plants that grow in your area with ease using the Plant Hardiness Zone Map that is included in each of the Realtime Landscaping software packages. Knowing your zone will allow you to add plants quicker and more effectively by narrowing your selection to plants that can survive the conditions in your area.
Hardiness zones are determined by the annual minimum temperature of the region. You can locate your zone by opening your Realtime Landscaping software package, clicking Tools, and selecting Plant Hardiness Zones. The Plant Hardiness Zone map covers the USA, Canada, Europe, Australia, and Mexico.
June 11, 2010 – Adding 2D and 3D Dimensions
Whether you are using Realtime Landscaping Architect, Pro, or Plus, you can add a professional touch to your designs by showing the dimensions of important objects or areas. Dimensions are shown by using the 3D Dimension tool just like measuring tape, and drawing lines that automatically display the correct distance. 3D Dimensions will appear in both the 2D and 3D views.
To add a dimension, simply click the 3D Dimension tool and draw your dimension line. Once a dimension is added, the color of the dimension line and the text can be adjusted. Dimensions can also be easily hidden by clicking “Dimensions” under the Settings menu.
May 28, 2010 – Precision Landscape Design using the Keyboard Entry Feature
While creating and editing objects, you can press the Enter key and enter relative coordinates directly. This makes it easier to create house walls, fencing, decking, and other objects your specifications. You can also choose to enter survey bearings for creation of your property line.
To use the Keyboard Entry feature, press the Enter key while creating an object, or while editing the points of an object. A small dialog with appear with two options: “Angle” and “Survey Bearing”. Choose Angle to enter the desired coordinates as an angle and distance relative to the last point, or “Survey Bearing” to enter a survey bearing. Click here for more information about the Keyboard Entry feature.
May 21, 2010 – New Customer Support Hours
To better serve you, we have changed our customer support hours from 9am–5pm to 8am–4pm (still Monday–Friday). Our new hours will be much more convenient for our many customers living in the Eastern USA and Canada.
Idea Spectrum provides free telephone and email support to all of our customers. Have a question? Please email support@ideaspectrum.com or call toll free 1-866-894-4332. Outside the USA call 253-862-2678.
May 14, 2010 – Landscape Planters
Use planters of your choice to hold annuals, perennials, cacti, and even small shrubs and trees. A wide variety of 3D planters of many shapes and sizes are available in all of our landscape design software. The planters are easy to add to your landscape, after which any number of plants can be placed in them. 3D planters are added using the Accessory object, while 2D planters are added using the Picture object.
For even more variety, you can also add your own 2D planters by taking a photograph and importing it. If you are using the latest version of Realtime Landscaping Architect, Pro, or Plus, you can also create your own 3D planters using the new modeling tools. This 3D Planter Tutorial shows you how.
May 7, 2010 – Instant Video Previews
See how your videos will appear instantly while you design your landscape using the new Video Preview option. Added in version 2 of Realtime Landscaping Architect, and version 5 of Realtime Landscaping Pro and Plus, the Video Preview option allows you to visualize your videos before they are created, saving time and helping to perfect your results.
To use the Video Preview option, simply select the Realtime Camera that is being used for your video and drag the Preview slider. Dragging the slider will show a realtime preview to the right of the screen, and will make it easy to set up the perfect video for your clients.
April 23, 2010 – Large Output Printing Tutorial
We have added a new tutorial for something every professional landscape designer wants to know: How do you create large format printouts? You don’t need to own a large format printer to create beautiful landscape plans, posters of 3D renderings, and other printouts from our landscape design software. The tutorial includes instructions and tips for working with companies that will print your landscape designs for you.
Large Output Printing Tutorial
Note: You can access this and other tutorials by clicking “Help > Tutorials” directly from your landscape design software.
Please contact us if you have any questions about large format printing, or would like to suggest additional tutorials.
April 16, 2010 – Creating Custom Pergolas
While Realtime Landscaping Architect, Pro, and Plus include a wide variety of pre-built pergolas, you can also create your own custom pergolas of practically any shape and size. Our latest landscape design software includes a complete suite of modeling tools, including 3D boards which can be used to assemble virtually any wooden or vinyl structure. You can use an existing pergola as a starting point, or create a new one from scratch. When you’re finished, you can save your creation to your library of custom models and use it in any of your landscaping projects.
To build a pergola, use the Part tool and select the desired boards. You can also create custom boards and other shapes using the Extrusion tool. These can be easily moved, rotated, and lifted into place, much as if you were designing with actual physical objects. You can choose from a wide variety of colors and materials including wood, vinyl, and more.
New to creating custom models? Don’t worry, it’s easy and fun! No prior CAD experience is required. Here are some tutorials to help you get started.
Introduction to Custom Modeling
Creating a Custom Patio Table
Creating a Custom Planter
Creating a Custom Pond Bridge
April 9, 2010 – New Updates Available
New updates are now available for each of our Realtime Landscaping software products. These updates contain minor fixes, tweaks, and performance improvements, such as faster rendering when moving Plant Fill and Plant Row objects. A complete list of changes will be shown as the update is being installed.
If you use Realtime Landscaping Architect 2, or Realtime Landscaping Pro/Plus/Photo 5, then your update can be downloaded by clicking “Help > Check for Updates” from within your landscape design software. The update will download and install quickly, usually taking just a couple of minutes.
You can also view the updates using the following links:
Realtime Landscaping Architect 2 Updates
Realtime Landscaping Pro 5 Updates
Realtime Landscaping Plus 5 Updates
Realtime Landscaping Photo 5 Updates
April 2, 2010 – Swimming Pool Design
If you have a swimming pool in your landscape design, or plan to add one, Realtime Landscaping Architect or Pro will help you quickly design and visualize your pool with ease. Use the wizard to add a complete swimming pool in a few mouse clicks, or draw your own using the many advanced, yet easy to use tools. When walking through your landscape using the “Walkthrough” feature, realistic water will ripple in your pool and will flow from any waterfalls or spillways that you been added.
No prior CAD experience is needed to design high-quality 3D swimming pools, because our software uses an “object-based drawing system” that features intuitive tools that anybody can use. To create a swimming pool, just click on the Swimming Pool button and begin drawing the outline of your pool. Swimming pools can be any shape or size. When you are finished, colors and styles for the pool can be selected, and various objects such as pool stairs and ladders can be added. You can create both above and below ground pools, spas, pool decking, and much more.
March 26, 2010 – Stunning Video Presentations Made Easy
Impress your clients with a 3D video of your project using the movie creation tools included with Realtime Landscaping Architect, Pro, and Plus. Movies can travel through your landscape design in any fashion, even including pause points for areas of interest. Movies will exhibit the same level of detail found in a Realtime Walkthrough, including rippling water, birds and butterflies, realistic shadows, and more. Once a movie is created, you can burned it to a CD or DVD for playback on your client’s computer (CD/DVD burning software not included).
To create a movie, first add a Realtime Camera to your design. The Realtime Camera is a tool that allows you to draw the path that the movie will take as it plays. Once the camera path is set up the way you like, just click the “Create Movie” option under the “View” menu.
March 19, 2010 – Design Efficiently by Saving and Loading Shapes
Save time and work with precision by saving and loading shapes. Objects like garden beds, swimming pools, and decking all support shape saving, which allows you to store your designs in a special file for later use. For example, if you create a deck design that you think you may need to use later, just save it to the shape library. When the time comes to use your deck design, a couple of clicks will load your deck into your landscape. Additionally, the shape library already includes many common shapes that can aid you in your designs.
To save a shape, simply click the button with the drop-down arrow next to the Edit Points button; shapes can also be loaded in the same way. Your shape will be saved in a special library, along with a detailed preview that will allow you to quickly identify the shape you are looking for.
March 12, 2010 – Import your Pictures and Materials
Integrate your digital work into any of the Realtime Landscaping packages using the Picture Import Wizard. Import photos to include in your designs, such as trees, houses, and even pets. Alternately, materials can be imported and used on the included objects. For example, take a picture of your unique brick patterns and use them when designing your landscape.
The Picture Import Wizard is located under the Tools menu, and provides an easy method to placing your imported picture in the correct part of the software. The Wizard is very intuitive and takes only a few seconds to complete, leaving you with more time to design your landscape.
March 05, 2010 – Navigate 3D Designs like a Pro
View and edit your landscape designs with ease using the 3D NavWheel. Located at the bottom left of the screen whenever you are working in 3D, the NavWheel supports each of the movement controls that are used to maneuver through a 3D design. The NavWheel makes Realtime Landscaping Architect, Pro, and Plus practical and intuitive for beginners and veterans alike.
To use the NavWheel, just click and drag the mouse on the part of the wheel you wish to use. The NavWheel sections are Zoom, Pan, Orbit, and Change Height. These options will allow you to move your viewpoint to any position in your landscape without any prior 3D experience.
February 26, 2010 – Adding Round Corners and Bevels
Fine-tune your landscape designs with ease by adding bevels or rounded corners to your objects. In addition to powerful “Bezier” curve editing, two tools are available to quickly convert sharp corners to perfect curves or accurate bevels. The “Round Corner” tool and the “Bevel” tool make it easy to achieve beautiful results with CAD precision.
To use the Round Corner or Bevel tools, click Edit Points to enter point editing mode. Then click the Round Corner or Bevel tool and drag the mouse over the corner that you wish to modify. Or, you can first select multiple points if you want to change more than one at a time. These tools are great for editing grass or mulch regions, retaining walls, edging, patios, decks, and more. The Round Corner and Bevel tools are found in the latest versions of Realtime Landscaping Architect, Pro, and Plus.
February 19, 2010 – Using the Offset Tool
When designing complex shapes (such as swimming pools, curved decking, and rounded patios), a tool called “Offset” can make the design process quick and accurate. The Offset tool expands or contracts the outline of complex shapes in a few easy steps, substantially speeding up the design process. The Offset tool is available in the latest versions of Realtime Landscaping Architect, Pro, and Plus.
To offset an object, click the Offset button and click and drag on the object you wish to offset. As you drag the mouse, you will see the object’s outline expand or contract in the direction you move the mouse. Here’s an example.
February 12, 2010 – Editing your Pictures
Make quick modifications to your imported plant and other pictures using the Realtime Picture Editor. The Picture Editor is included with all Realtime Landscaping software packages, and handles photo-editing tasks like masking, cropping, and color correcting. The Realtime Picture Editor can be used to edit pictures before or after they are imported into your landscaping package, and can also be used to edit existing plants.
To use the Realtime Picture Editor, click the options button that appears next to the picture thumbnail when using any of our landscape design software. You can also open it from the Windows Start menu. The Picture Editor uses the same intuitive layout as each of our landscaping programs, and is designed to be used by beginners and experts alike. The Picture Editor includes a full help guide, accessible by pressing F1 while using it.
February 5, 2010 – Adding Pets to your Landscape Designs
Include pets and other animals in your landscape designs using any of our Realtime Landscaping software packages. Dog houses of several different styles can be added to your designs, in addition to food bowls, bird feeders, and bird baths. Add further detail to your landscape by adding life-like pictures of dogs and cats.
To add a pet accessory to your design, click the Add Accessory tool and choose the desired item from the library. Dog houses are listed in the Structures category, chain link fencing is in the Fencing category, and other miscellaneous items such as food bowls, bird feeders, and bird baths are found in the Other category. You can also add photos of animals using the Add Picture tool.
Have a specific pet you would like to add to your landscape? Simply take a picture using a digital camera, upload it to your computer, and then use the Picture Import Wizard to import it into your landscape design. Using the Realtime Picture Editor, you can remove the background and help make your pet appear to be a natural part of the landscape.
January 29, 2010 – Easily Rotate and Scale your Landscaping Objects
In all of our Realtime Landscaping software packages, there are many intuitive and helpful shortcuts to help you create the perfect landscape design. Rotation and scaling are two of the most common actions used when placing or editing an object in your design. Rotation will change the angle of your object, while scaling will change its size. Instead of editing these functions through the property panel, it’s much faster to simply click and drag with your mouse.
To quickly rotate an object, simply select it and then click and drag the green dot that appears above it. As you drag the mouse, your object will rotate in place. Similarly, you can adjust the size of the object simply by dragging the green rectangle that appears above and to the right of the selected object. As you scale, the object will become larger or smaller, depending on whether you move the mouse up or down.
January 22, 2010 – Landscaping with Hedges
Adding hedges is easy and fast with Realtime Landscaping Architect, Pro, and Plus. Hedges add privacy, decoration, and sometimes even security to a landscape. An attractive alternative to fencing, hedges are often cheaper and provide better insulation from traffic noise. When designing your next landscape, take the time to explore the possibilities of hedges.
To add a hedge in Architect, Pro, or Plus, click on the Hedge button and draw a path for your new hedge. Hedges can run in straight or curved lines, and can be square-shaped or round. There are several different types of hedges to choose from, all with easily adjustable widths and heights.
See how to quickly add a new hedge to your 3D landscape design.
January 15, 2010 – Using the Mask Tool with your Photo Landscape Designs
When using Realtime Landscaping Photo to design your landscape, you can increase the realism by using the Mask tool. When designing over a photo, there are often times when you want to add a plant, furniture, or other object that should appear to be behind something already in the picture. For example, suppose you are landscaping over a photo of your backyard, and you want to spruce up the trees behind the fence. You can use the Mask tool to ensure their trunks and lower foliage do not overlap the fence, making it appear as if they were part of the picture all along.
To add a Mask, click on the Mask button and draw around the part of the object that should not show. For example, if a tree has branches that poke out around the corner of a house, then just “mask” away the part of the tree that you want to hide.
Click here for more information and some examples.
January 8, 2010 – Removing Existing Objects in a Picture
A frequent question among designers is how to remove unwanted objects from a photograph, and the answer is simple: the Clone tool. The Clone tool uses advanced image processing techniques which allow you to “paint” over objects in the photograph and remove undesirable elements. The Clone tool is found in the Realtime Picture Editor, which is included with all recent versions of our landscape design software.
To use the Clone tool, open the Realtime Picture Editor and load the image you wish to modify. Click the Clone tool button and proceed to remove unwanted objects from the picture. For help using the Clone tool, just press the F1 key while it is selected.
December 18, 2009 – The Plant Creation Wizard
At Idea Spectrum, we are always working on adding new plants for our Realtime Landscaping Software. This summer we traveled to the east coast, and next spring we plan to travel to Toyko and focus on Japanese Gardens. However, there are several hundred thousand species of plants, so even with the thousands that are already included with our software, we still have a lot of work to do.
You don’t have to wait for us, though. Using the Plant Creation Wizard, you can easily create your own plant varieties using the plants included with your software as a starting point. Your custom variety can have a unique name, size, and even color. This exciting feature is supported in the most recent version of all of our landscape design software.
To create a custom plant, first select the one you want to use as a starting point, and then edit the color and brightness if desired. For example, you could start with a maple tree and use the Picture Editor to change the leaves to a fall color. Next, select the Plant Creation Wizard from the Tools menu. Follow the step-by-step instructions and enter the common name, botanical name, planting zones, and other information. When the wizard is complete, your new plant will be added to the plant library under the Custom category.
Idea Spectrum wishes you a Merry Christmas and Happy Holidays!
November 27, 2009 – Adding your Company Logo
“How do I stand out?” is always at the front of the business owner’s mind. With Realtime Landscaping Architect, your business can stand out by adding your company name or logo as a watermark to your landscape designs, 3D images, and movies. Adding your company logo will help to personalize your designs and lends legitimacy to your company in the minds of your clients.
To set up your company logo in Realtime Landscaping Architect, click Settings and Company Logo Settings. Once the image for your logo is selected, you can control when and where the logo appears, as well as the size and transparency. Once your settings have been entered, the logo will appear automatically when appropriate.
Idea Spectrum wishes you a Happy Thanksgiving.
November 20, 2009 – The Project Material List
The Project Material List is a powerful feature that makes estimating your landscape design projects quick and easy. While adding and changing parts of your design in each of the Realtime Landscaping programs, the Project Material List keeps track of the objects you have added. Within the Project Material List, objects (such as plants, mulch regions, etc.) can be renamed as needed and given prices. A total price for the design is calculated based on the prices you set.
To view the Project Material List from any Realtime Landscaping product, click Tools and Project Material List, after which you will see a complete and organized listing of every object you have added to your landscape design. To rename an object, simply click it and type a new name. To set the object’s price, click the Unit Price field and type the desired price.
Output options include printing and saving to disk. You can also export the Project Material List to Excel, which is a great way to add additional costs such as labor, excavation, and other costs.
November 13, 2009 – Add Greenhouses to your Landscapes
Greenhouses are a great way to take gardening to a new level. By having more control over your plants’ environment, you can grow healthier and wider varieties of plants. In each of the Realtime Landscaping programs, a variety of 3D greenhouses can be added to your designs. Pots and planters can then be added inside the greenhouse to accommodate your selection of plants.
To add a greenhouse, click the Add Accessory button on the Landscape tab. Then click the Structures button on the left, scroll down to the greenhouses, and click the one you want. Once you have added your greenhouse, you can resize it as needed. Next, pots and planters can also be found in the Accessories library and placed inside the greenhouse. Finally, your selection of plants can be added to complete the design.
November 6, 2009 – Creating and Using Templates
Using Realtime Landscaping Architect, a useful trick is to save your own customized Plan View templates, including borders, scales, and title block. While simple to do, saving and reusing templates helps to keep your plans looking consistent and saves valuable time when starting a new landscape design.
To create a template, start a new design and switch to Plan view. Then add a title block, page border, measurement scale, compass, and other details that are common to your designs. Place these objects into their own layer to help keep them separate from the rest of your work. Then save the design using a unique file name, such as “Template1”. You can use any objects you want, including shapes, text, symbols, and more. For an example of a pre-made template, open “Landscape Template A4” using the File > Open Sample command.
October 30, 2009 – Accurate Landscape Lighting and Shadows
When presenting 3D designs to your clients, you can add a professional touch by ensuring that the sun is casting shadows in the right direction. In this landscape, for example, notice how prominent the tree shadow direction is. Many clients will notice this attention to detail and increase your chances of winning their business. Using Realtime Landscaping Architect, Pro, and Plus, the sun’s direction and the time of day can easily be set.
The sun direction is determined automatically by the compass direction and time of day. For example, when the time of day is set to Morning, the sun will be in the east and shadows will fall in the east-west direction relative to the compass. To set the compass direction, simply click the compass object (the arrow on the right side of the landscape) and set its rotation angle. To set the time of day, click Settings and Environment Settings. To view your design with realistic shadows and lighting, click the Walkthrough button.
You can also add landscape lights and view your designs at night. To do this, set the time of day to Sunrise, Sunet, or Evening. Any lights in the design will turn on automatically. This is a great way to visualize lawn, path, accent, and other landscape lighting ideas. Use the Screen Shot feature to create high-resolution renderings of your designs. Or better yet, use the movie creation tool to create virtual walkthroughs which will bring your designs to life.
October 23, 2009 – Windows 7: A New Platform for Realtime Landscaping Software
Windows 7 was released yesterday and tested by our staff. We are pleased to report that based on this testing, the official Windows 7 release runs the current versions of our Realtime Landscaping software beautifully, without any patches, modifications, or changes to the Windows settings. The transition to Windows 7 promises to be very smooth for both us and our valued customers.
The Windows 7 testing was performed using current versions of Realtime Landscaping Architect, Pro, Plus, and Photo. Users of earlier versions may need to adjust Windows settings for optimal performance, or upgrade to the latest version of our landscaping software.
October 16, 2009 – Windows 7: Initial Testing
We are happy to announce that our Realtime Landscaping software has passed our preliminary compatibility tests for Windows 7. This means that current and future versions of Realtime Landscaping Architect, Pro, Plus, and Photo should install and operate on Windows 7 without additional patches. When Windows 7 is released, our customers should be able to continue using our software if they upgrade Windows or buy a new computer.
We believe that the reason our current software operates on Windows 7 right out of the box and without any modifications is because it has already been optimized for Windows Vista, which uses a very similar interface to Windows 7. When the official version of Windows 7 is released, we will conduct additional testing and make solving any minor issues a top priority. If a minor issue is found and corrected, we will post a free update online for users to download. Please note that Windows XP and Windows Vista will also remain supported for the foreseeable future.
October 9, 2009 – Building your Own Waterfalls
Cascading water is often associated with tranquility, be it cresting waves at the beach or a waterfall near a wooded trail. By creating a waterfall in your landscape you can capture that peaceful ambiance while adding to the visual appeal of your design. Waterfalls can be virtually any size and shape, and can run into swimming pools, ponds, or custom basins. In Realtime Landscaping Pro, and Architect, custom and pre-built waterfalls can be added.
To create your own custom waterfall, first use rocks, accessories, or the modeling tools to create the 3D waterfall. Next, add the Flowing Water object that is found in the Waterfall library. Then, select your new waterfall and use the Model Creation Wizard to save it for future use. Set the object type to “Waterfall”
October 2, 2009 – Designing your Landscape over a Blueprint
Do you have existing 2D blueprints of your house and/or property? Using Realtime Landscaping Architect, you can save time by importing those blueprints and using them as templates for designing your landscape. Designing over blueprints makes the design process even easier and more accurate, and you can view the result in both 2D and 3D.
You can import AutoCAD drawings, scanned pictures, and other images as overlays using BMP, JPEG, PNG, or TGA format. If you have AutoCAD installed, then you can embed the AutoCAD drawings directly into your design as an OLE object. This makes it easy to import house plans, property lines, planting detail, and other blueprints to help you accurately design your landscape. Using the Layer feature, you can easily show this detail while designing, and hide it when printing your finished landscape. Here’s an example.
September 25, 2009 – Faster Landscape Design using Snapping Options
One of the many helpful tools in our landscape design software is a powerful set of snapping options. Snaps help to “click” your objects into place in your 3D landscape or to a certain rotation angle. For example, when creating a house it is very useful to use the “Snap Grid”, which makes it easy to quickly build a house with straight walls and accurate dimensions. In all of our 3D Realtime Landscaping software, many different snap options are available.
To change how the snaps work, click on Settings and Snap Settings; all snaps can be turned on or off at any time. Aside from the extremely useful Snap Grid, other snap options include Angle, Point, Midpoint, Edge, and Perpendicular. Snaps make designing easier for both professionals and novices, allowing you to spend less time worrying about accuracy and more time envisioning your ideas.
September 18, 2009 – Modular Playgrounds and Swing sets
Nearly every adult appreciates a well-designed landscape, but with the addition of a playground or a swing set, a landscape can also grab the attention of younger audiences. In all Realtime Landscaping software, both prebuilt and modular playground equipment is included.
To add a playground piece, select the piece you are interested in from the Accessories library, and then click within the landscape to place it. The library includes pre-assembled playground sets, as well as modular pieces such as slides, swings, and monkey bars so you can build your own. By setting the snap grid to 2′ (0.61 m), the sections will snap together intelligently to make the play set design process fast and easy. You can use the integrated modeling tools to further customize your playground to fit your landscape design.
September 11, 2009 – Landscaping with Terraces
Landscaping on sloping and uneven terrain can be a challenge. When the slope is steep, using retaining walls to create terraces are an elegant way to provide both structural support and an attractive view. Many different retaining wall materials can be used to create the terrace, and virtually anything can be used to decorate the terrace itself, so the design possibilities are endless. Realtime Landscaping Architect, Pro, and Plus provide comprehensive support for retaining walls and sloping terrain.
To create a terrace, first use the Slope tool to create a slope in the design. Next, click on the Retaining Wall tool and draw the retaining wall. Under the Retaining Wall’s options, check the “Cut Terrain” option. This will cause the retaining wall to cut into the terrain, forming the terrace. There are several other retaining wall options you can use to adjust the cut to your preference, and there are additional terrain sculpting tools to add more detail to the slope. The materials for the retaining wall sides and the retaining wall cap can be set independently. For more detail and examples, see Adding a Retaining Wall.
September 4, 2009 – Fantastic Gazebos
A Gazebo is truly a wonderful addition to any landscape design. A focal point for outdoor gatherings, the gazebo is both practical and decorative. Gazebos can house furniture, grills, or even fire pits, making them useful in all seasons. Many different gazebo designs are included with our landscape design software, and can be added quickly and easily.
To add a gazebo to a landscape design, just click on your favorite gazebo from the Accessories library and place it in the landscape. Once the gazebo is placed, it can be resized and given different materials or colors. Furniture, outdoor kitchen equipment, and lights can be placed in the gazebo and around it. For gazebos with their own patios or decks, simply use the Patio or Deck tool to build the gazebo’s base.
August 28, 2009 – Fence Design
Security, decoration, privacy; these are some of the important aspects of a good fence. Additionally, a fence is an investment that can add value to your property, or to the property of your client. Realtime Landscaping Architect, Pro, and Plus include a 3D fence tool that allows you to design realistic fences of virtually any type. Not only will the 3D fence tool help you to re-create existing fencing in a landscape to make your design more realistic, but it is also a great tool for designing new fences in realtime 3D.
To create a wooden or vinyl fence, click on the Fence button under the Landscape category and draw the outline of the fence. Once the outline is complete, the fence will appear and allow you to change various aspects of the fence, such as the wood grain, color, railing, caps, posts, height, and more. Gates can also be added through the Fence Gate button with just two clicks of the mouse. To add wrought iron or chain link fencing, access the Fencing button within the Accessories library.
August 21, 2009 – Outdoor Wooden Deck Design
A good deck is a very valuable asset for any home, and an important part of many landscape designs. Whether you are designing a new deck for a client or landscaping around an existing one, being able to accurately show the deck in 3D will go a long way toward making your design stand out among your competition. In Realtime Landscaping Architect, Pro, and Plus, detailed and realistic 3D decks can be created in virtually any shape and size.
To add a deck, simply click on the Deck button and draw the perimeter of the deck. After the deck is completed, over a hundred different wood materials are available for the deck finish. Other aspects of the deck can also be adjusted to your liking, such as the railing, the direction of the wood grain and the wood boards, and the deck stairs. Using the Realtime Walkthrough feature, you can walk around your property and view your deck in full 3D.
August 14, 2009 – Edging Your Way to a Great Landscape
Edging is both decorative and useful to professional landscapes; it frames your carefully designed plant regions and acts as a retainer for dirt or mulch. Edging also provides a nice transition between your yard or patio and the plant region while adding a feeling of solidity to the entire landscape. In each Realtime Landscaping program, edging can be added in a variety of different materials, including brick, stone, concrete, and even wood.
To add edging in any of the Realtime Landscaping programs, click on the Edging button, then click to begin drawing the shape of your edging. Edging can be made in any length or path shape, and can be set to many different widths and heights. Once the edging is created, its composition can be selected from the large library of edging materials.
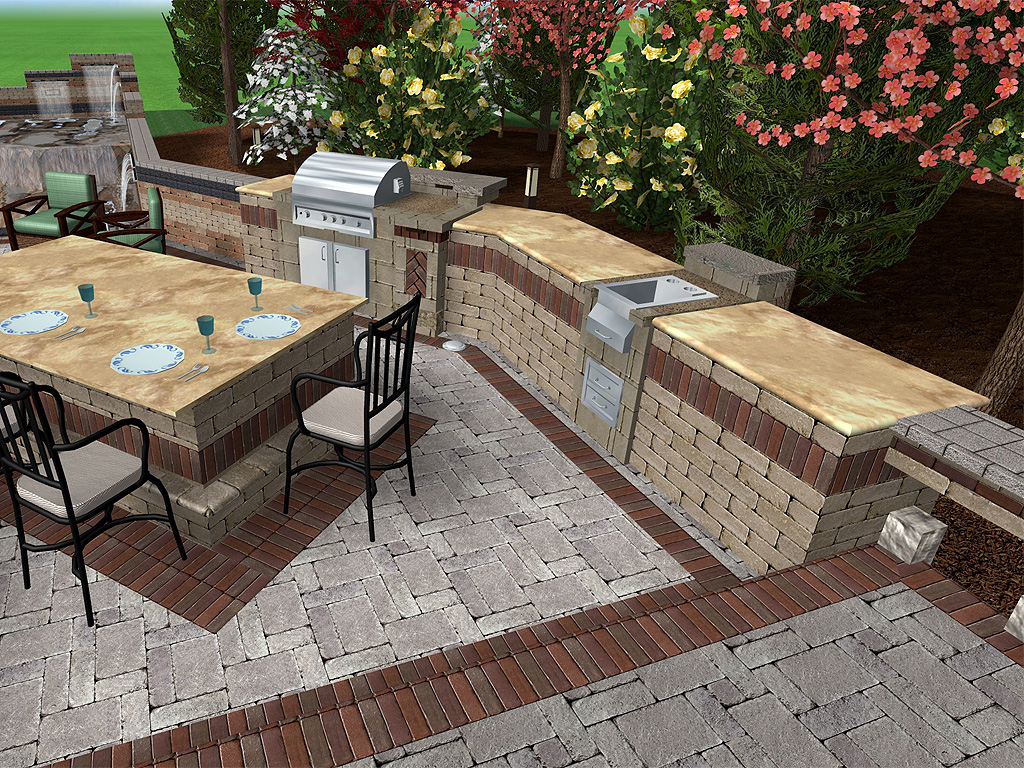
August 7, 2009 – Outdoor Kitchen Design
Outdoor kitchens are a great addition to nearly any landscape; they encourage gatherings and add a comfortable atmosphere to decks and patios. Within all of our 3D landscape design software, many different outdoor kitchens can be designed. Along with cabinets and fireplaces, grills, sinks, and stoves can be added to enhance your design.
To start designing your outdoor kitchen, simply click the Add Accessory button (on the Landscape tab) and then click the Outdoor Kitchen category. Once you have chosen your object, just click where you would like to place it. The outdoor kitchen equipment can be resized, re-colored, and rotated as needed.
July 31, 2009 – Using Professional Plant Symbols
One of the highlights of Realtime Landscaping Architect is that it includes nearly two thousand varieties of artistic and CAD-style plant symbols. Most of the symbols were hand drawn by landscape design professionals. Using these plant symbols, landscape designers can produce traditional CAD drawings, or drawings that look like they were created in colored pencil or watercolor. Regardless of what symbol is chosen for the Plan View, the 3D view will always show the life-like plant as if you were really there.
Adding a plant in Realtime Landscaping Architect is simple: just click on the Plant button, choose which plant you would like, and place it in the design. To change the plant symbol, just click on the picture of the plant symbol and select a different symbol from the library.
Click here for an example of how Realtime Landscaping Architect’s plant symbols can make your plans more professional and compelling.
July 24, 2009 – Idea Spectrum is Reviewed on Studio 5 Television
Realtime Landscaping Plus was recently reviewed on television and online, and was chosen as the best landscape design software in its class. Highlighted among its features are its ease of use, its impressive appearance, and its fast design speed. Following are some quotes from the review:
“The software is truly easy to use and the landscapes we created were vivid and precise.”
“Anyone can use this product and make their yard look fantastic.”
“In no other software we tested could we create such beautiful designs in so little time.”
The full review that was aired on television, along with the online written review, can be found here.
July 17, 2009 – Designing Over a Picture Using Realtime Landscaping Photo
Sometimes the ideal landscape design is simply a before and after picture of the property. This type of design can be done easily and quickly using Realtime Landscaping Photo. Because designs in Photo are done on top of a picture of the landscape, the end result is extremely realistic. Even if a full 3D design is required, a Photo design can be done first as a quick way to feel out what the customer wants.
Realtime Landscaping Photo is offered by itself, and is also included with Realtime Landscaping Pro, Plus, and Architect. What makes Photo so easy to use is its intuitive drag and drop functionality. What makes it powerful is the large library of plants, accessories, and hardscaping, as well as tools to make the newly added landscaping blend in with the original picture.
July 10, 2009 – Add Special Effects to your Landscaping Objects
Special effects can greatly enhance your custom landscaping objects. For example, a stainless steel barbeque grill can have a realistic reflective chrome finish instead of a common steel material. Special effects available include glass, variable levels of transparency, chrome, and variable levels of specular lighting (shininess). These effects allow you to create or modify virtually any type of object, including windows, outdoor kitchens, and greenhouses.
With the release of Realtime Landscaping Pro, Plus, and Photo 5, and Realtime Landscaping Architect 2, any part of any object can now have a special effect, called a “Shader”. To apply a shader, convert your object to a Custom Model, select the parts of the object you wish to change, and then select the effect from the shader list. By experimenting with the different shaders, each material can be given many different appearances.
July 3, 2009 – Making your Landscape Designs More Realistic
When creating a landscape design, every extra detail helps to bring your work to life. For example, why settle for pain grass surrounding your design when you can add realistic roads, cars, telephone poles, fire hydrants, and stop signs! While the roadway and surrounding areas are usually not the primary focus of a design, they can help to bring the entire design into perspective and add realism in the process.
With all of our 3D landscape design software, roads, cars, and other roadway accessories are included. To add one of these accessories, simply click the Add Accessory button and select the object of your choice.
Have a happy and safe Fourth of July.
June 26, 2009 – Create Beautiful Koi Ponds
Koi ponds are great additions to many landscape designs. The soothing water ripples, lazy fish, and peaceful sound create an area of serenity that adds character to your landscape. Additionally, koi ponds can add life to an otherwise motionless landscape. In Realtime Landscaping Architect and Pro, koi ponds of any shape and size can be created.
To add a koi pond, simply use the Pond Wizard and select from one of many prebuilt ponds. You can then click Ungroup and customize it to blend with your landscape design. You can also create koi ponds from scratch using the Pond tool. After the pond is created, the material, water, border, and depth can be adjusted. When entering the Realtime Walkthrough mode, koi fish are automatically added to the pond and swim around realistically – they can even be fed!
June 19, 2009 – Add Free Models from Google SketchUp
Because our landscape design software supports Google SketchUp models, you have access to thousands of free 3D models that you can easily add to your designs. These are in addition to the thousands of choices that are already included with our landscaping software. To locate these free models, simply search for the SketchUp 3D Warehouse. Once you have downloaded the models you like, you can import them into your landscaping designs by clicking Tools and Model Import Wizard.
Thanks to the new modeling tools that are included with Realtime Landscaping Architect, Pro, and Plus, it is easy to modify the materials of imported SketchUp models or to simply change the model pieces. Once a SketchUp model is imported into your landscape, it will always be available for use in future landscape designs as well.
June 12, 2009 – From 2D to 3D Made Easy
Never has it been simpler to switch between a 2D view and a 3D view in any software. With the click of a button, you can change your perspective from looking at your design at an angle to viewing your landscape from above. You can add and edit objects in both views, making the design process seamless and comfortable. For example, if you place an arbor while in the top-down (2D) view, you can instantly flip to the perspective (3D) view and adjust its appearance.
To switch between views, simply click on the appropriate view button at the bottom of the screen. Switching views can be accomplished in any 3D design at any time while designing your landscape. If you have an object selected when you change your view, the object will remain selected. Likewise, if you change your view in the middle of editing an object, you can continue to edit after the switch.
June 5, 2009 – Organize Your Plants
Taking note of every plant you add to your design can be painful, so let Realtime Landscaping Architect do the work for you! The Plant Legend is a powerful tool that takes only two clicks of the mouse to add and automatically fills with all the plants you have added to your design. If you add a new plant or remove a plant after the Plant Legend is in place, the Legend will update itself intelligently. Here’s an example.
Aside from providing important information in a convenient fashion, the Plant Legend makes a powerful impression to your client that your design and you yourself are organized and diligent. Additionally, the format and style of the Plant Legend are adjustable in order to blend well with the rest of your design.
May 29, 2009 – Summer Nights
Showing off a landscape design at night-time can have a powerful effect, especially with well placed landscape lights. During night or evening, your favorite landscaping features can be showcased with spotlights, and paths can be subtly lit for an inviting atmosphere. If you are a professional landscaper, showing your customers how their landscape will look at night will greatly increase the “wow” factor of your presentations.
In each of our Realtime Landscaping programs, the time of day can be set by clicking Settings and Environment Settings. Because night-time designs focus heavily on lighting, you have strong control over the lights that you place. The wattage of the lights can be adjusted to make them brighter or dimmer, and the color of the lights can also be changed. When walking through the landscape at night, the lights will switch on and illuminate the area around them. See some examples of landscape lighting designs here.
May 22, 2009 – Be an Artist
Landscape design is clearly a form of art; one that is appreciated over many years and adds value to your property. With our latest software, we have added some exciting new ways to create stylized pictures of your 3D walkthroughs.
With Realtime Landscaping Architect 2, Realtime Landscaping Pro 5, or Realtime Landscaping Plus 5, you can now save pictures in the style of watercolor paintings, traditional paintings, or colored pencil drawings. Simply design the landscape like normal, and select your style when you save an image from the Realtime Walkthrough mode. For an example, see the “pencil sketch” example here.
May 15, 2009 – New Updates Available
Updates have been released for Realtime Landscaping Architect 2, and for Realtime Landscaping Pro, Plus, and Photo 5. These updates will put Realtime Landscaping Architect to version 2.05, and Realtime Landscaping Pro, Plus, and Photo to version 5.05. The updates make some minor changes, such as adding wind support for custom imported 3D plants.
To download your update, either navigate to the correct product page on our website and click “Updates”, or simply click “Help” and “Check for Updates” from within your software.
May 8, 2009 – A Short History of Idea Spectrum
People often ask us how we got started, so here’s a short history of Idea Spectrum and its President/CEO, Jim Napier. Jim has been creating commercial software for the last 25 years and has developed over a dozen retail titles. He founded Idea Spectrum in 2004 and for the last five years has been leading the development of our landscape design software.
Prior to Idea Spectrum, Jim spent 12 years developing 3D software, including 4 years at Microsoft where he designed the 3D graphics engine for the Microsoft Combat Flight Simulator 3 and led the development of Crimson Skies for the Xbox. Both games were a huge success and have won many awards.
Jim’s goal in starting Idea Spectrum was to create clean, easy to use software for homeowners and landscape designers. The first program to bear the Idea Spectrum label was Water Garden Studio, a program designed for users to design ponds and the surrounding areas.
After further development, Realtime Landscaping Pro, Plus, and Photo were released. Pro, Plus, and Photo were much more advanced than Water Garden Studio, transforming Idea Spectrum’s product line from one pond program to a full landscaping line to be used by enthusiasts and professionals alike. Our latest product, Realtime Landscaping Architect, combines the ease-of-use of our homeowner software with the CAD features required by professional designers.
Over the years, the Idea Spectrum team has grown and is continually producing new and improved landscape design software. We listen closely to our customers and continually improve our software to meet their needs.